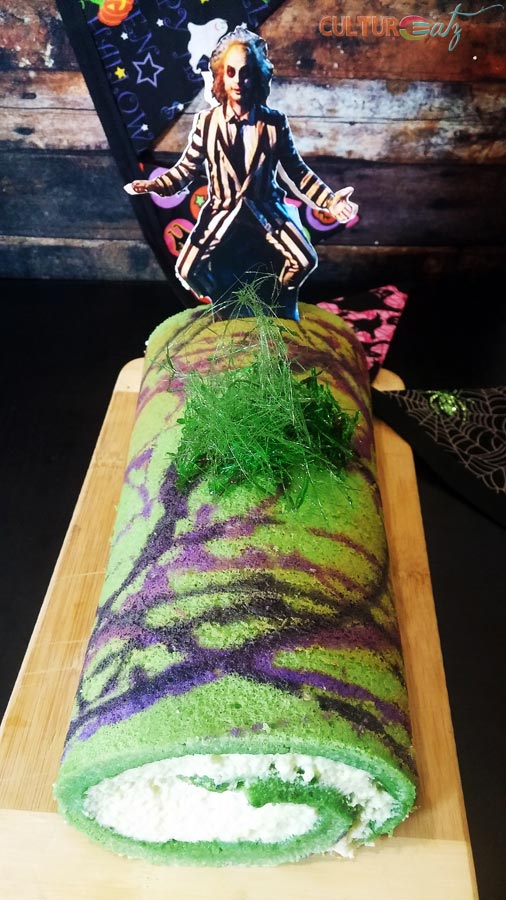
BOO! The cute & adorable Japanese deco Swiss Roll Cake recipe was hijacked this month to create a gousligh Beetlejuice movie themed cake for Halloween.
I am always super excited to present my big main Halloween post each year! And this year, with my goolish Halloween recipe, I got to knock down two skeletons with one big candy (ha ha). This post combines both the October 2016 challenges for Food ‘n Flix and the Daring Kitchen. The movie for Food ‘n Flix was Beetlejuice. The Daring Kitchen challenge was a decorated swiss roll cake. Hence, my evil mind gave birth to the scary themed Beetlejuice Swiss Roll Cake! Do you dare to take a bite?
Beetlejuice the movie
Beetlejuice is a 1988 comedy fantasy film directed by the amazing Tim Burton. The plot in a nut shell: a deceased young couple (Alec Baldwin and Geena Davis) are stuck as ghosts their former home. The home is purchased by a modern and annoying couple and their teenage goth daughter (Winona Ryder). The ghosts desperately want to get rid of the new owners. They fail in doing so while befriending the daughter who can see the ghosts. The dead couple employ the obnoxious ghost named Betelgeuse (Michael Keaton) from the Netherworld to help them in their task. Not a good move, he does not work well with others. Will all the residents find a peaceful ground to live happily together and will they get rid of beetlejuice? Whatch the movie to find out.
If you have not seen this movie already you have been living under a rock. I saw it at the avant premier when I was 14. My BFF of the time had won tickets. It was downtown Montreal and it was the first time my parents let me go alone in the city. But I remember my dad picked us up by car after. By today’s standard the film is super kitch but super fun. There are no real horro moments but there are ‘OMG so gross’ moments. I think the most terrifying part of the movie was seeing the horror of the 80s fashion again. So happy I got to see this film again!
Not a whole lot of food in this movie, these are the edibles, or sort of, I noted: orange juice, coffee, Cantonese, Sechuan, wine, herbal tea, beetles, chicken bone in throat, Zagnut bars, artichokes, salads, bread, rutabaga, shrimp cocktail, Coke, rum, and bananas (Harry Belafonte – “Banana Boat Song – Day O).
Decorated swiss roll cake technique
We were introduced to the Japanese decorated “kawaii” swiss roll cake technique, a popularized trend by the food blogger Junko. Kawaii is defined by the quality of cuteness in the context of Japanese culture. The decorated swill roll concept is based on the French pastry technique called joconde sponge. But the difference here is that one takes a small amount of sponge cake batter to pipe the decorative pattern, which ensures that the pattern and the cake are the same texture so that the cake rolls up with no problem.
The 6 egg sponge cake is very elastic and forgiving for the rolling. The simple syrup also helps by keeping the cake moist and pliable. Care must be taken to not overcook the cake at all or the cake may crack when you roll it. So better to undercook just a bit. My design is free-hand but if you plan on making a precise pattern, make a stencil for piping your pattern on. Keep in mind the image will be mirrored so if you are including writing make sure the words on the stencil are backwards.
UPDATE: whether with a decoration or plain, this has become my go to Swiss roll cake, it is so easy. I even used it to make my Boozy Peaches and Cream Trifle.
October 2016: this Daring Kitchen’s challenge comes to us fromKorena from Korena in the Kitchen. And I am combining this challenge with Food ‘n Flix which is hosted by Deb at Kahakai Kitchen . The cake and filling recipes come from Marjorie, the syrup comes from Korena, and the spun sugar from Natasha.
Be sure to check out my past Halloween posts as well, they are goulish fun!
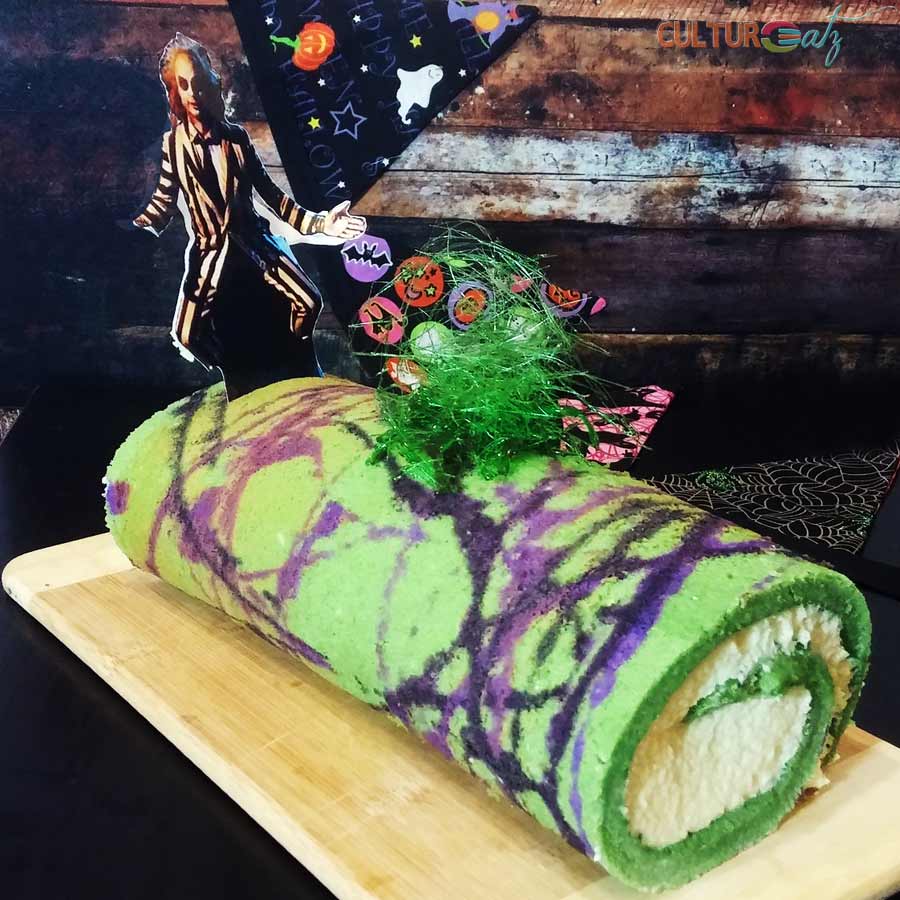
Beetlejuice Swiss Roll Cake
Ingredients
For the cake
- 1 1/2 cups flour
- 1 1/2 teaspoons baking powder
- 1/4 teaspoon salt
- 6 eggs
- 1 cup + 2 tablespoons sugar
- 1 teaspoon vanilla
- 1 tablespoon water
- 2 teasppons matcha plus black, purple and green gel food coloring
For the syrup
- 1 tablespoon caster sugar
- 2 tablespoons boiling water
- 1 tablespoon liqueur of your choice optional
For the filling
- 8 ounces white chocolate cups
- 1 cup heavy cream
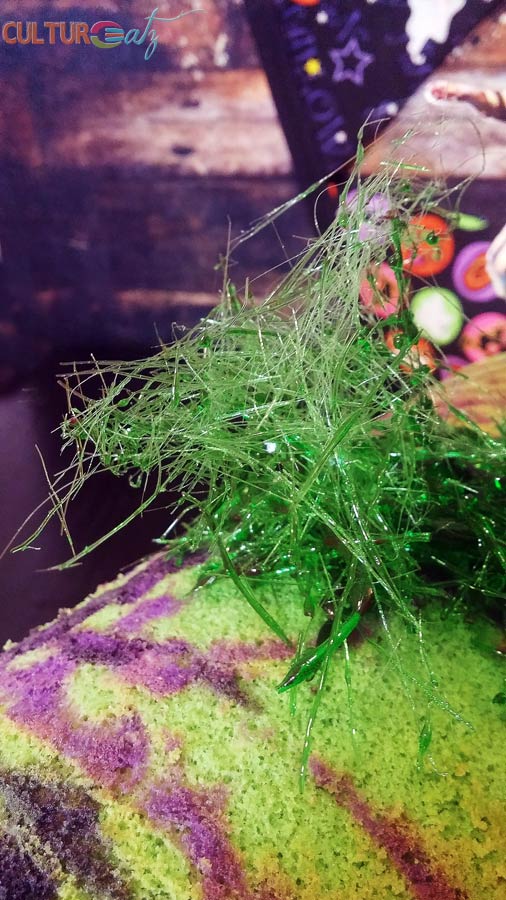
For the green spun sugar
- 50 g caster sugar
- 12 g water
- 12 g corn syrup
- Green gel food coloring
Instructions
For the cake
- Sift the flour, the baking powder and salt in a small bowl, reserve. With an electric mixer, beat the eggs. With mixer on, slowly add the sugar a bit at a time, and beat for 1 more minute all together. Slowly mix in the dry ingredients until well combined. Beat in the vanilla and water until incorporated.
- If using a stencil, place it on the left side of the baking sheet. Place a piece of parchment paper cut to the size of a half baking sheet.
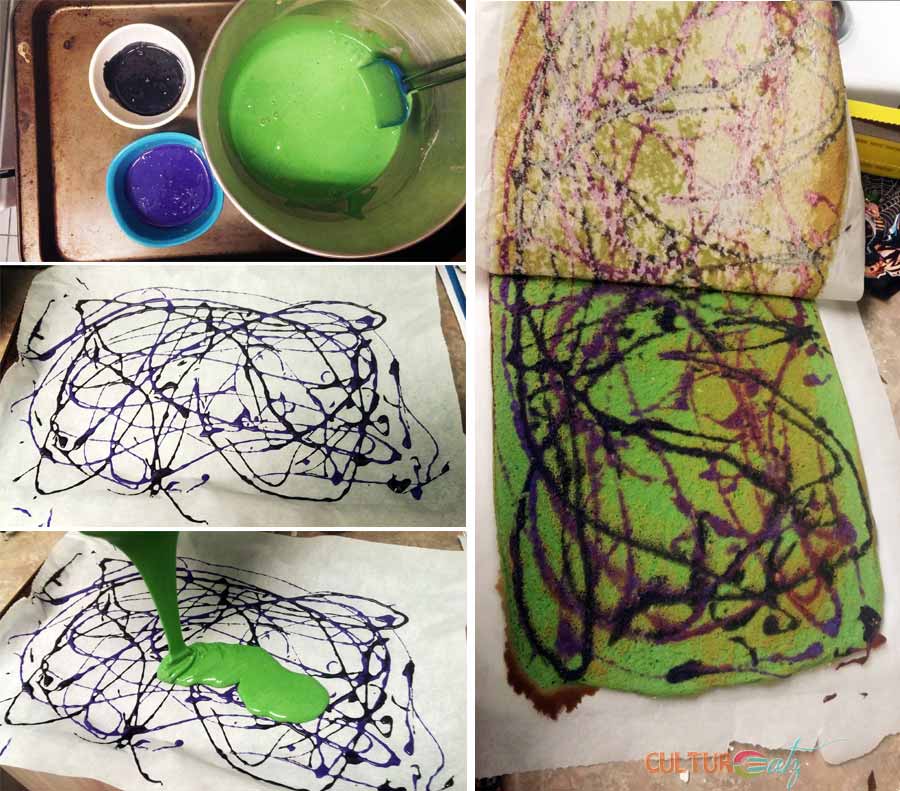
- Separate batter amounts for your design. About 1/4 cup is good for small designs. Mix each amount of batter with gel food coloring to the desired color. In my case I made a batch of purple and a batch of black. I flavored my main batter with 2 teasppons of matcha powder and a few drops of green coloring.
- Preheat oven to 375 degrees F.
- Pour decorative colored batters in piping bags and fill your pattern accordingly.
- TIPS: do any outlines first and fillings seconds. FREEZE between each color applications for 15 minutes to prevent your batters from bleeding together.
- Once all your design is piped and frozen a bit, remove the stencil from under the parchment paper, then pour and gently spread your main batter evenly over the entire sheet pan.
- Bake for about 8 to 12 minutes or until a toothpick comes out clean. Be very careful not to overbake.
- Lay a second sheet of parchment paper on a large cutting board. Right away when the cake is out of the oven, invert the cake onto the piece of parchment paper and gently remove the top parchment paper. Cover with another sheet of parchment paper and turn the cake again over with the cutting board for help so that the decorations are facing the counter.
- Roll the cake up with the side away from the decoration and leave to cool.
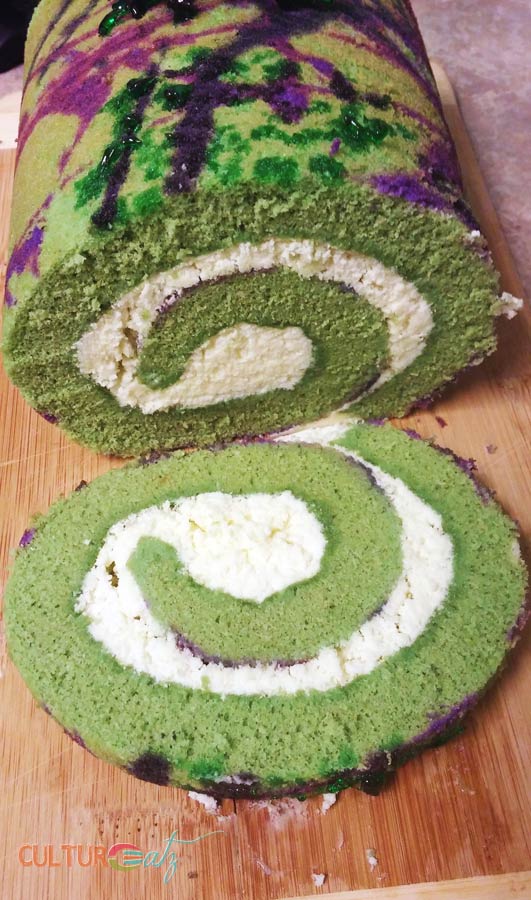
For the filling
- Bring the cream to a boil or heat in the microwave. In a bowl, pour the hot cream over the chocolate chips. Set aside for 10 minutes, then stir until smooth and the chocolate is all melted. Cool the mixture in the fridge for a bit, then whisk with an electric mixer on medium until filling is light and fluffy.
For the syrup
- In a small bowl, combine the caster sugar and boiling water. Mix until the sugar is dissolved. Stir in the liqueur if desired, or equal amount of water. When the cake is completely cool, unroll and brush the simple syrup over the inside of the cake with a pastry brush and let it soak in. Trim edges clean.
- Spread the filling over the entire inside of the cake. Roll it up again and leave to set in the fridge for a few hours.
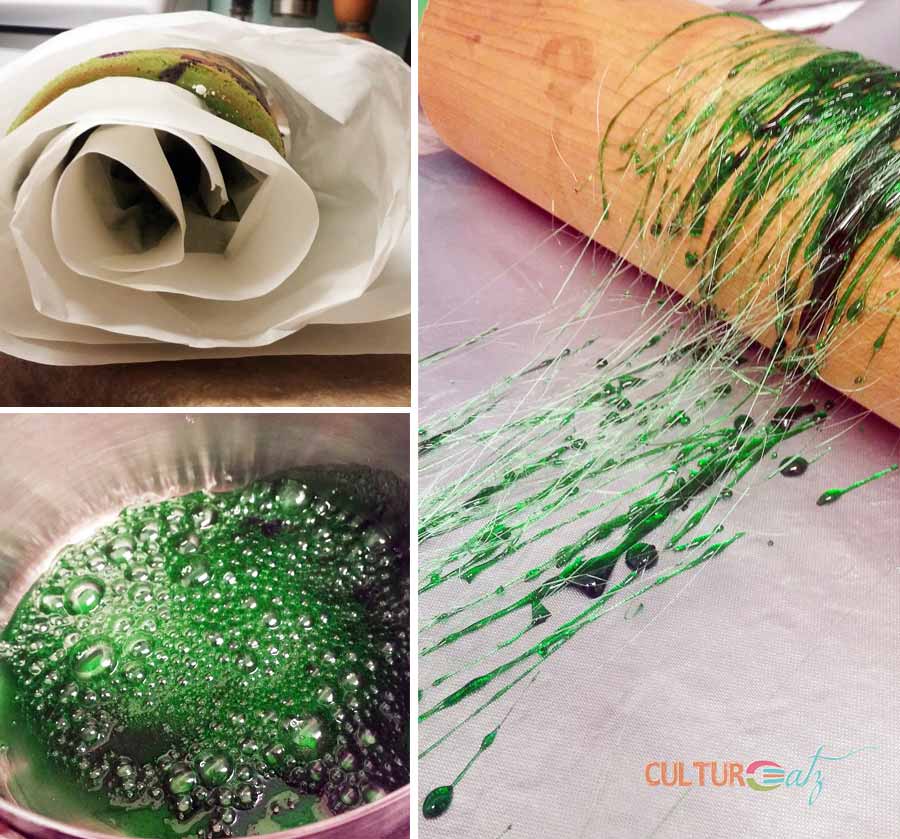
For the green spun sugar
- Place a sheet of parchment paper on your counter and a rolling pin on top. Bring all the ingredients to the boil in a saucepan and brush down the sides with water to prevent crystal formations. Keep boiling until you reach 155 degrees C. Let the mixture cool for a couple of minutes.
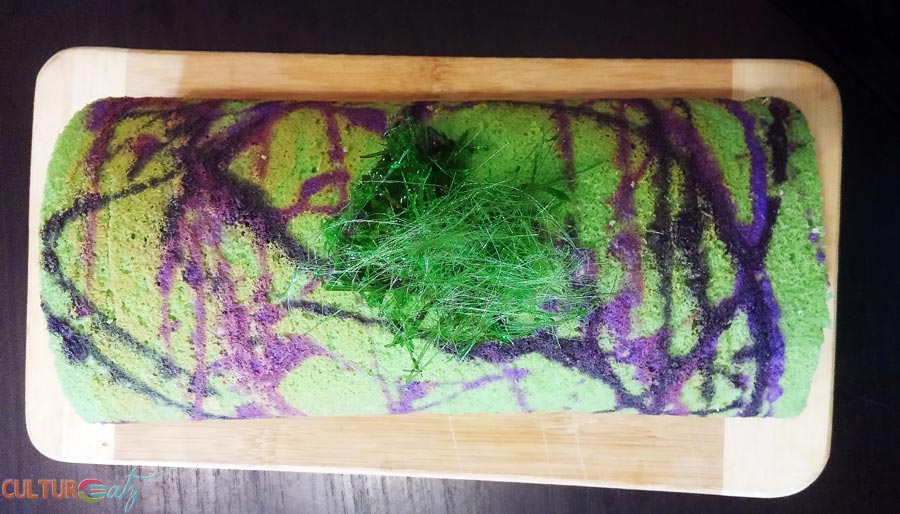
- Dip a fork in the sugar and flick it across the paper. If strings of sugar form you are at the right temperature. Work quickly to spin all the liquid. Gather up with your fingers into your desired shape and place on top of cake.


THAT IS SO COOL!!! Wow!
Went all Jackson Pollock with “beetlejuice” and it looks amazing!
I love all the different colors on the splashes and the amazing use of contrast colors!
WOW!
Thank you Ketutar! Yeah that is very Jackson Pollock I had not even noticed lol. Glad you like the cake 🙂
Oh my god, you win. That’s amazing! And I should have had you in my brains this month, cause that’s totally Hallowe’en.
Ha ha thanks Kimberly, took time to get inspired but then ran with it.
Ahhh!!! SO creative! I love it!
Thanks Amy 🙂
Wow that is one awesome contribution to Food n Flix, love the spun sugar too, its something i tried once and failed it was quite thick – need to try again.
Thank you so much Shaheen and I was to quick to flick (ha ha) my spun sugar, you really got to wait to the right temp. I did such a small batch so no waste if it did not work.
YUM! Matcha roll cakes are one of my favorite sweets, I love seeing one Beetlejuice-ified!
I am a big matcha fan too Katharina, so glad you like the creepy theme lol.
That looks awesome! I remember that movie! I love the fact that you’ve combined some genuine baking skill here with something totally unique and out there. It’s amazing what food can do.
I think food can be like an artist,s palette and the chef is limited to his/hers imagination. Thanks for your comment 🙂
Me, me me I am one of those you mentioned who has been living under a rock :). Your posts are always so funny and inspiring Eve. This looks so good although we don’t celebrate such things but this is good as I can bake this anytime of the year. BTW: I cannot fin the china tea link it gives me 404!!
LOL well come out of that rock Amira! I am glad you laughed. Yes the cake is adaptable to any occasion. Yeah the tea post is now up today so you can check it out 🙂 I had hit publish but wanted to schedule…feeds still got notified even if I took it off the site.
Such a funny movie! Haven’t seen it in years. Heck, decades! Gotta watch it again. And make this — so inspired. And fun. And I’ll bet hugely tasty. Thanks!
Seeing Alec baldwin so young, it was shock lol. Well I will give you on colleague’s comment about the cake:” I wish I could swim in it” lol. Thanks!
This is so cool! I’ve never tried making this but this recipe actually looks approachable. I loved the Beetlejuice movie when I was growing up!
Thanks Nathan, totally doable just make sure to roll the cake as soon as it is out of the oven to cool while rolled and you’ll be all good.
Only you Evelyne can come up with all this creativity…the Swiss roll cake looks fabulous, I just wish I could be there to try it…
Have a wonderful week my dear 🙂
Why thank you Juliana for the creativity comment lol. It was fun and delicious! Have a great time off.
That is a spooky looking cake perfect for Halloween, haven’t seen Beetlejuice yet the plot sounds good will check it out!
Thanks Prateek glad I scared you into liking to cake hi hi.
Pretty and delightful ♥
Thank you Summer 🙂
That is fantastic! What a deceptively simple idea. I’ve not attempted spun sugar before but it always gives things a professional looking element.
Thank you Nadia, and yes not hard to make but you have to take your time when rolling and not over-baking or the cake sheet will crack. The sugar was fun to make 🙂
What a fun Halloween dessert! That filling looks amazing, and you outdid yourself with the spun sugar garnish!!! Very nice!!
Thank you so much Liz, will we see spun sugar in your blog future 🙂 ?
I love the look of this – I’ve never tried this technique on cakes before.
Thank you so much Caroline and I hope you make a swiss roll soon 🙂
THAT CAKE IS AMAZING! Seriously – you’re above and beyond creative. I saw it on IG and I am in just such AWE with you cakery!!
Ah thanks so much Gigi, that is so nice.Maybe I should open a Halloween cakery lol?
This is absolute genius Eve!! I love how you made such a gorgeous Swiss roll but in Halloween colours 😀
Thanks Lorraine goulish sweets are so fun!
You are amazing! It’s so perfect and just stunning. And I love the caption (lol!)
Thank you so much, you are to cake queen I take it as a great compliment 🙂
Looks awesome. Great idea for Halloween, and what a classic movie, Beetlejuice.
Thanks Megan it was great fun to come with.
Look at you! that is a Master Chef quality cake.
Why thank you so much Raymund 😀
I think this looks BOO-tiful (and delicious)! This could easily be adaptable to many holidays depending on the color scheme. I love your color choices for this Beetlejuice post!
Well BOO to you to Debra 😀 Thanks and yes any holiday can work with this swiss roll for sure.
Wow, Evelyne, this is fantastic! I love that you were able to combine the two challenges – your Swiss roll turned out perfectly and is also perfectly Beetlejuicy! The spun sugar is a great touch. Nice work!
Thank you Korena for the challenge, the creative (beetle)juices flowed lol. Like I said the joconde challenge was such a fail I never thought I could do this type of thing right, so big thanks!
What a fun cake roll! So cool with the spun sugar, Evelyne.
Thanks Angie 🙂
Wow, yours turned out amazing. My second attempt was not as pretty as the first. Love the colours you used.
Thanks Tandy. I did not use the recipe given, if you try again take this one, much simpler.
Great job Evelyne!!! That is one spooky looking cake….not quite as frightening as the 80’s fashions but close LOL
Thanks Wendy! LOL so agree and the scariest part of the 80s fashion is that I had some of those pieces lol.
I love it! Your cake is so creative–the colorful syrup design and that spun sugar are just perfect. Definitely a ghoulish Beetlejuice feel to it for sure! 😉
Thanks for joining in this month!
Thank you Deb for hosting such a great choice and glad you like my cake. Happy Halloween!
I have never made a swiss roll, let alone one decorated as beautifully as this one! I love the Beetlejuice twist, so much fun…and that spun sugar is the perfect way to finish it off.
Thank you so much Heather, I hope you make a swiss roll soon, they are fun (if not a bit nerve racking lol).