Today I am sharing with you the ultimate food photo edit tutorial where I reveal every trick in my book to help you edit your pictures better in Photoshop.
I am going to share a whole bunch of my trade secrets with you today: how to do a better food photo edit. Now, this post is focused on food photography but you can use these tricks for any picture.
Of course, the idea is to take a better picture in the first place that requires as little editing as possible. I am still working on that. But even the most seasoned food photographer will need to touch up a few things in post-production.
I am letting the cat out of the bag, they do the same thing as I am about to show you!
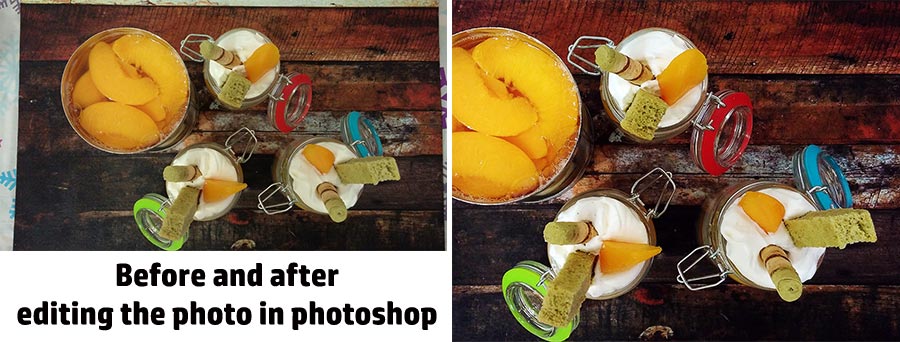
I played around for years with Photoshop without really knowing what I was doing. Then one day I came across a few excellent tips and I was very happy with the results.
And I also had the opportunity to take an advanced Photoshop class through work for my day job but picked up as many gold nuggets I could for the food photography.
Now, this tutorial is for Photoshop but many of the features are available in Lightroom (which I mostly use now), or in any or most of the paid or good free photo editing software.
Also this tutorial assumes you are somewhat already familiar with Photoshop and know where the basic features are located. On with the food photo edit tutorial…
Photoshop for Food Photography
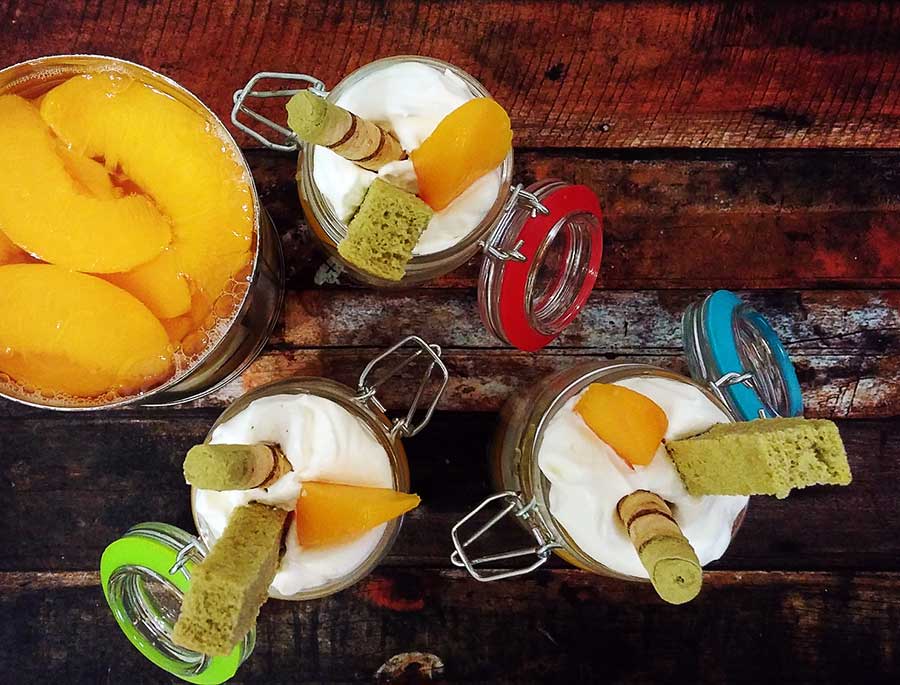
I am going to use a photo from my Boozy Peaches and Cream Trifle recipe blog post for demonstration purposes. Now I don’t use every single one of the steps below each time. Every photo is different.
But for this tutorial, I have applied every Photoshop trick I know to help you edit your pictures better, including the best way to sharpen an image: the high pass filter technique. I bet many of you did not know that one!
Food Photo Edit Tutorial
For each step I will show you a screen shot of Photoshop. Please check below for a printable version of the steps without the pictures. Make sure to print it out and follow along with your own images.
- Open Photoshop
- Open a photo in Photoshop
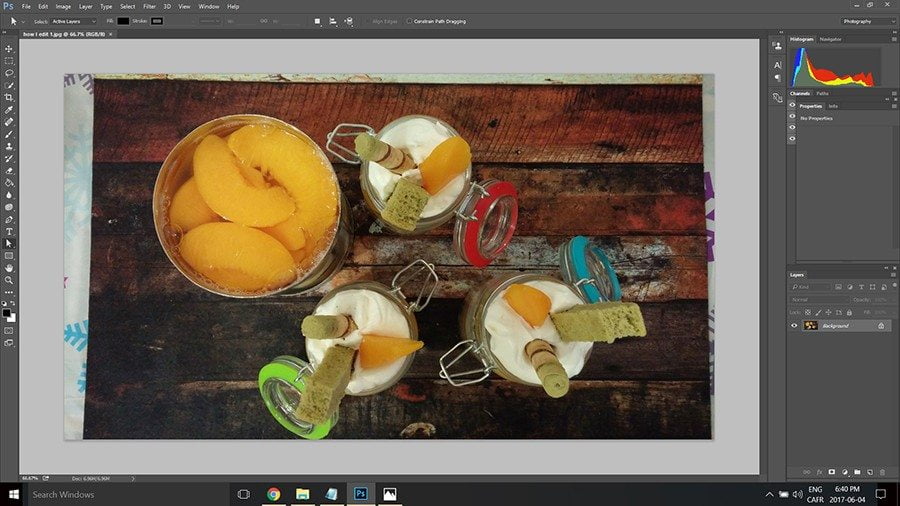
- Make sure Layers panel is open on the right (Windows, Layers)
- Crop your image
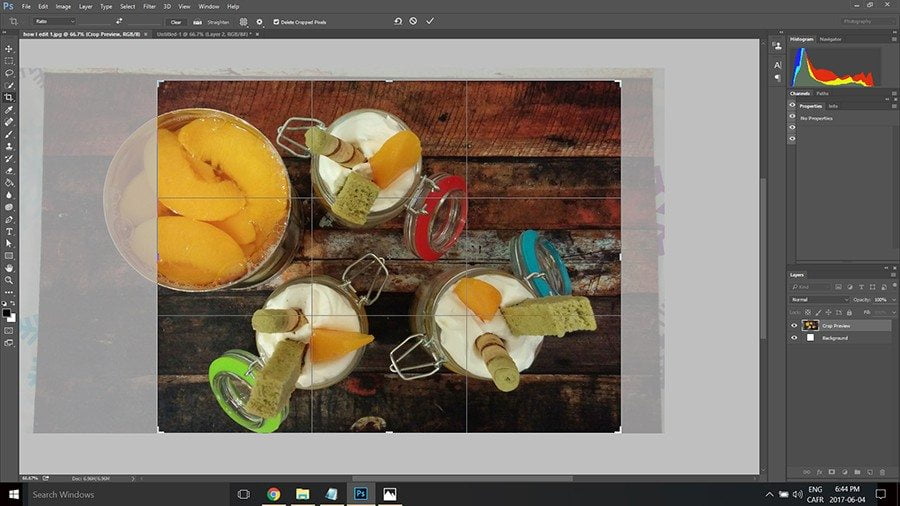

- Apply an Auto Tone shift+ctrl L
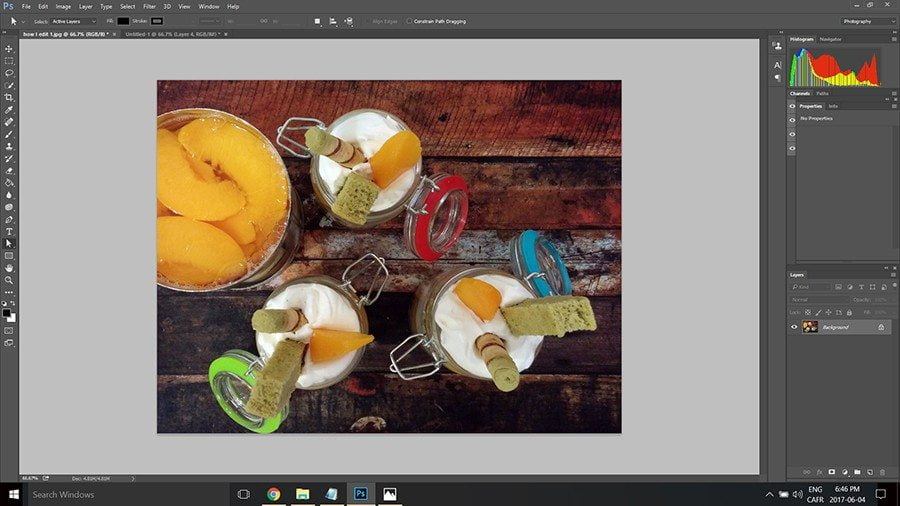
- Duplicate your layer ctrl J
- In layers select soft light from drop down and adjust opacity to around 30%
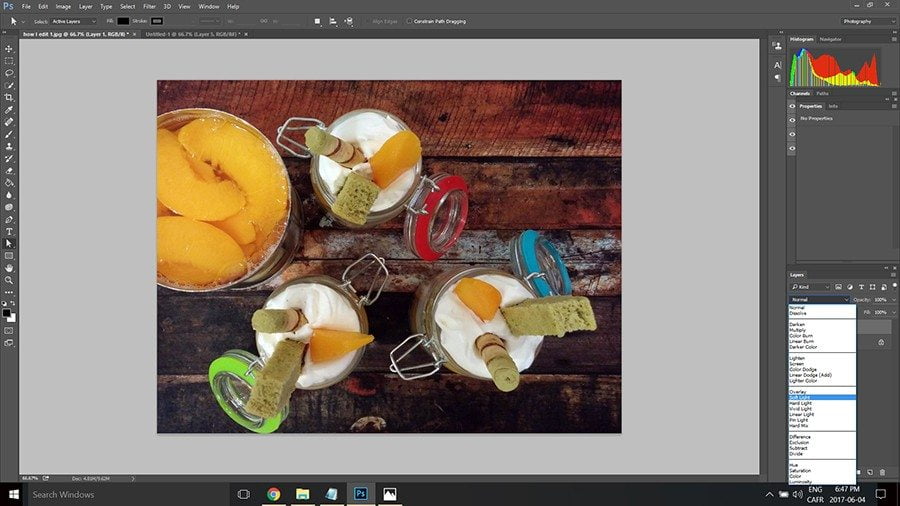
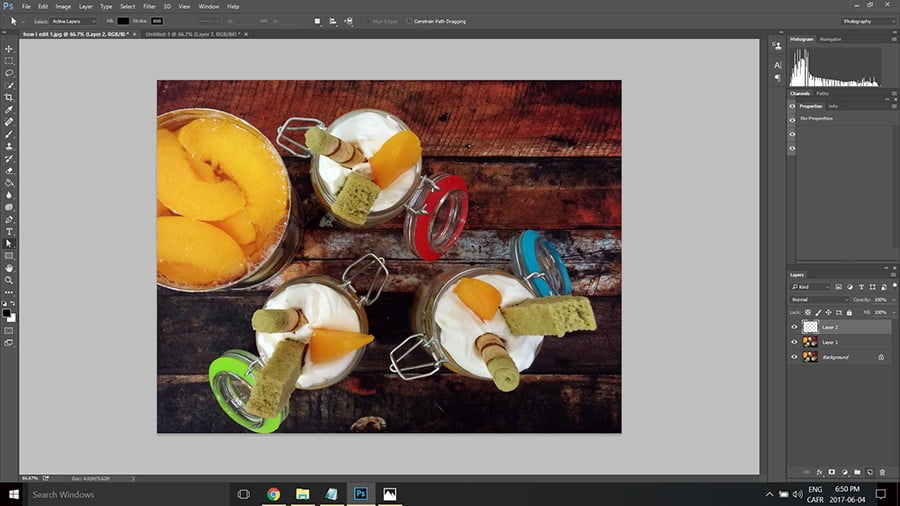
- Duplicate your layer ctrl J
- In layers select overlay
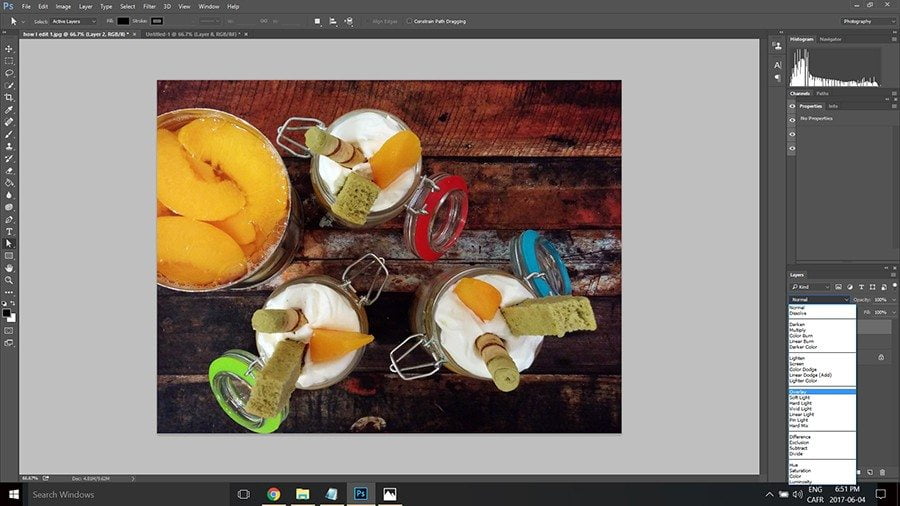
- Select brush tool and pick the color white
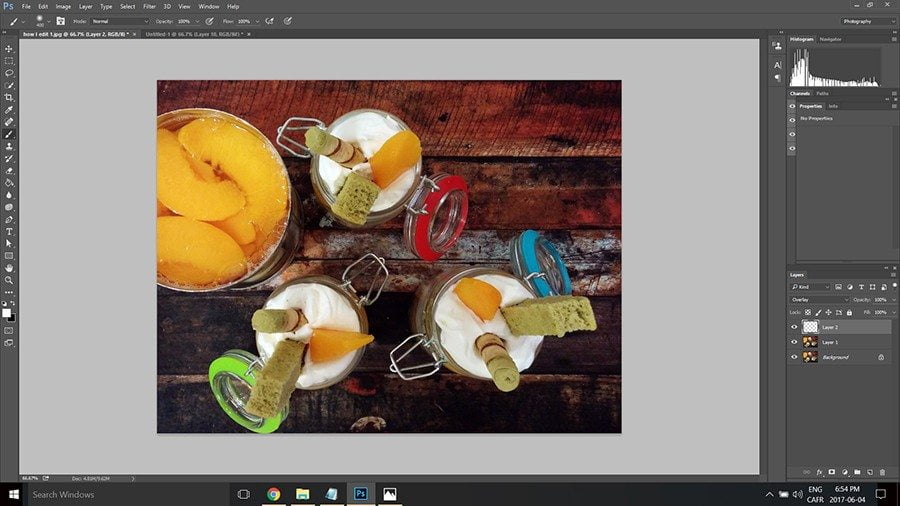
- Select a size for the area you want to paint and lower harshness to zero
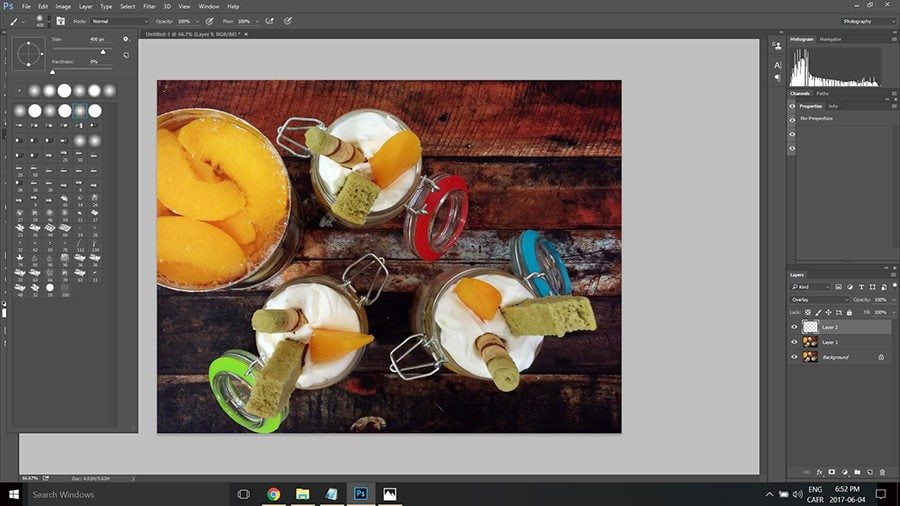
- Paint in the areas you want to highlight
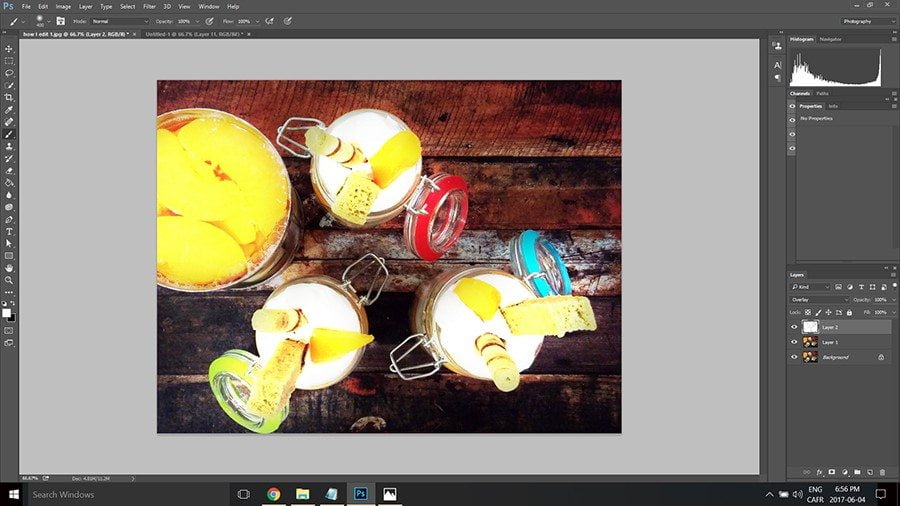
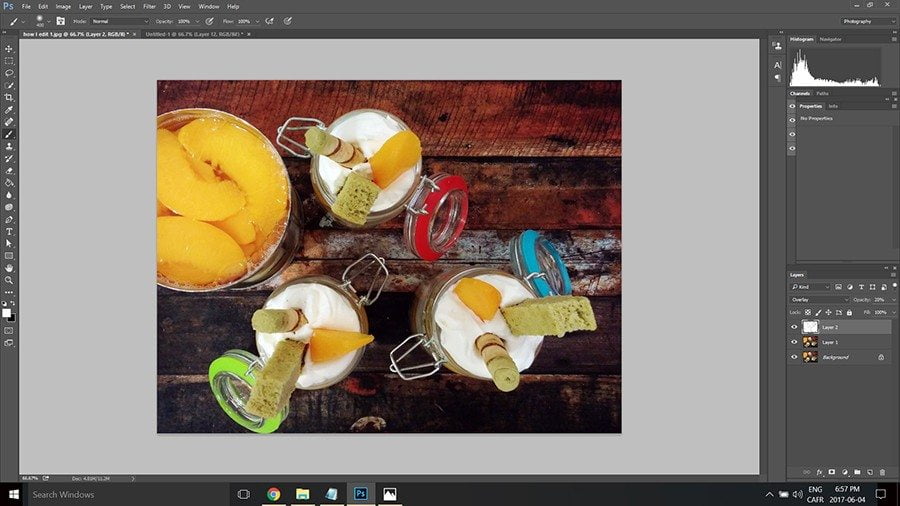
- In the layers panel set your overlay at around 20% (I went back and set it at 15% later)
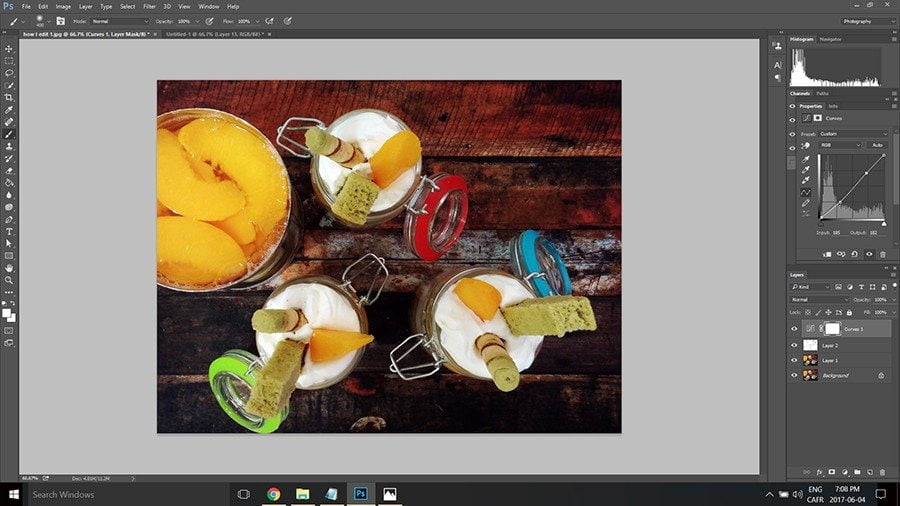
- Open a Curves layer to adjust tonal range: add highlight by adding and moving one point on the top of the diagonal line. And add shadow by adding and moving one point on the bottom of the line. Don’t overdue it.
- Open a Vibrance layer, here I chose vibrance on the slider at 30 (avoid the saturation slider)
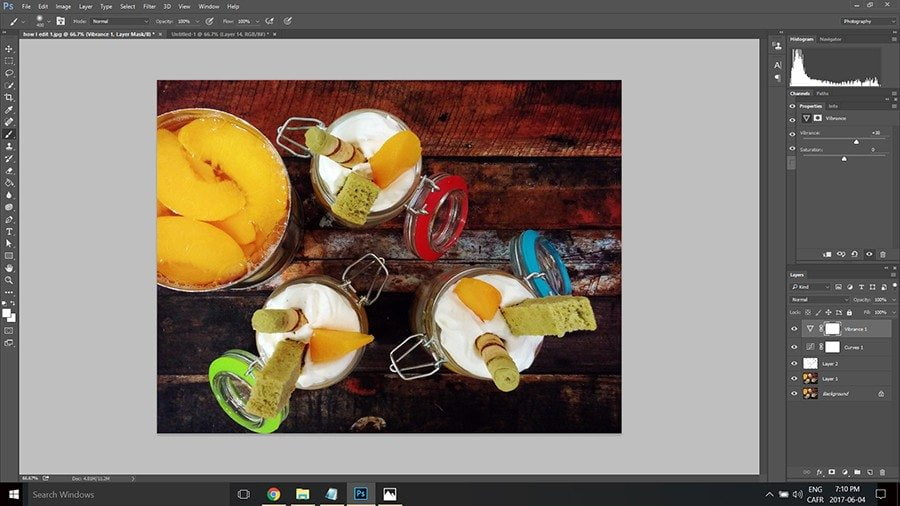
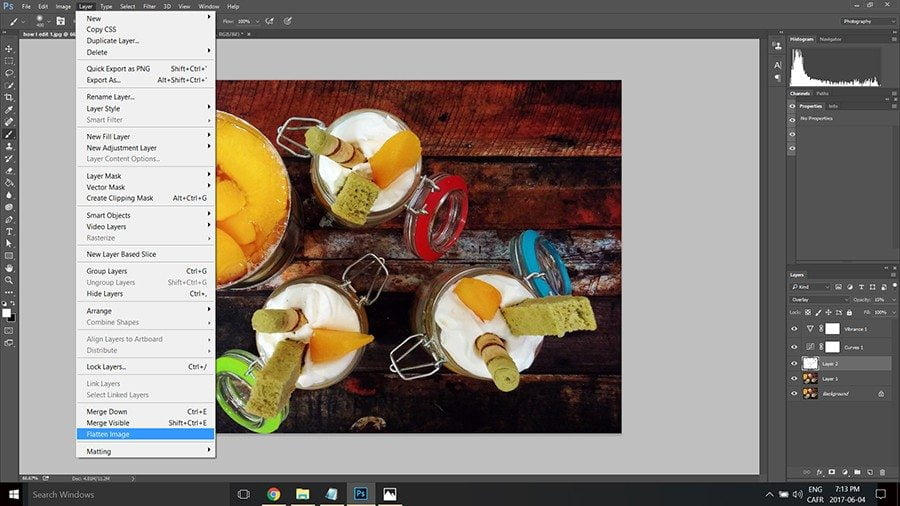
- I am happy with the edit but I want to sharpen the image a bit. First step is to flatten all my layers
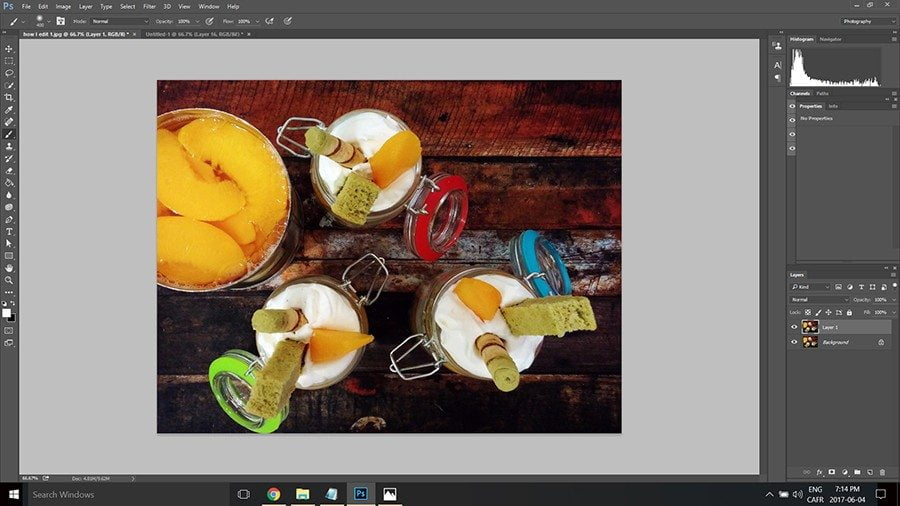
- Duplicate your layer ctrl J
- Turn your photo black and white by pressing crtl U
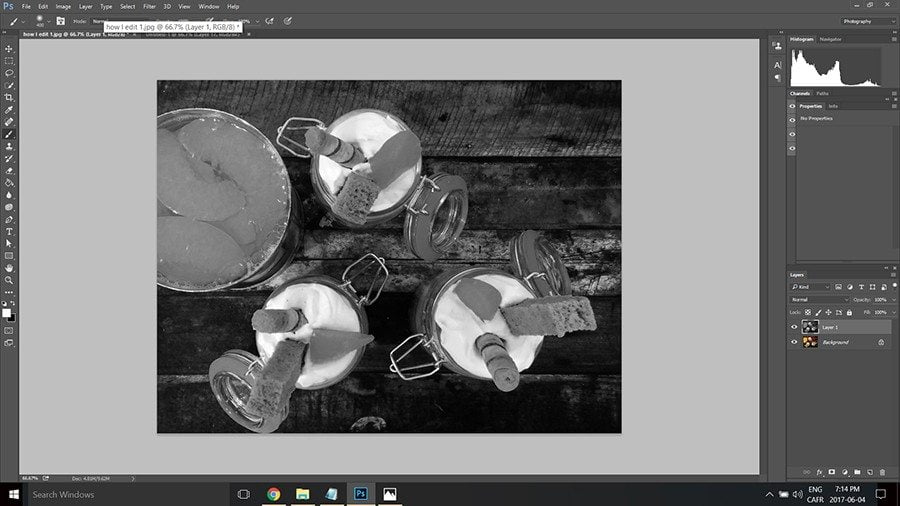
- In layers select overlay
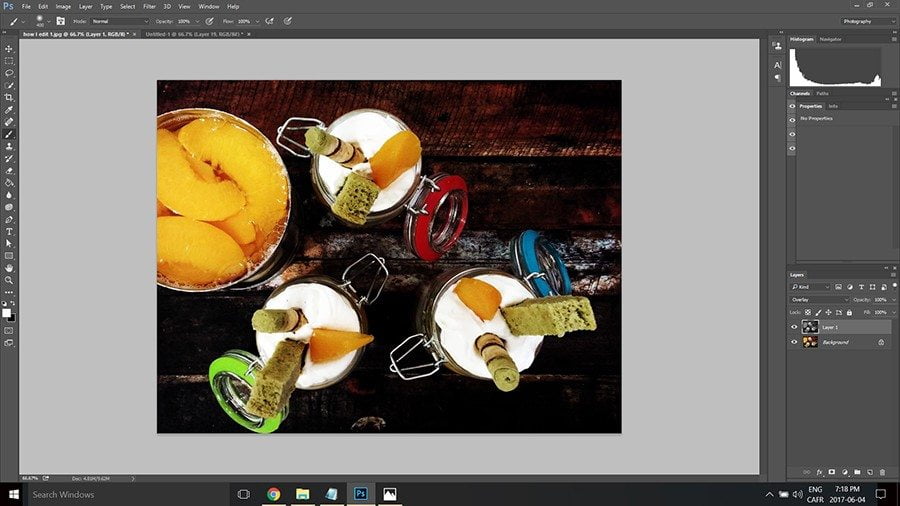
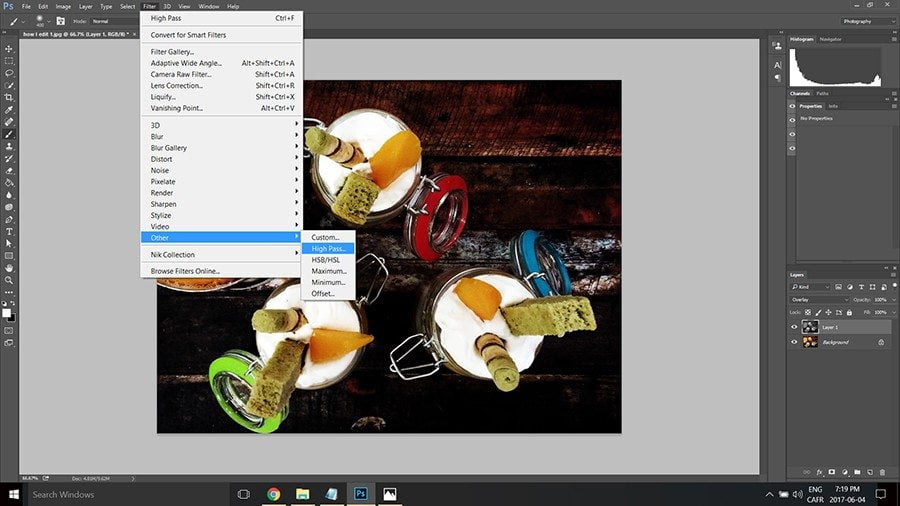
- Go in Filter, Other, High Pass
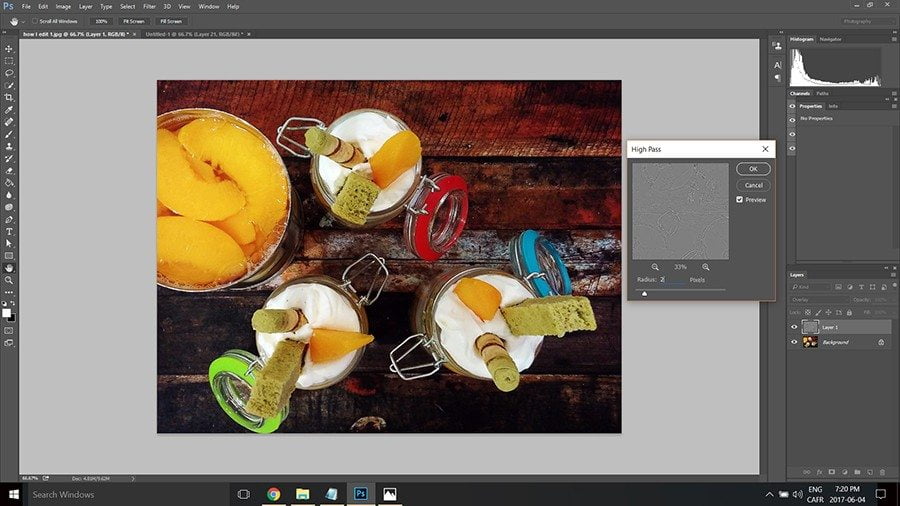
- In the High Pass window select a radius, usually around 1.5 to 3. Check preview. Press OK.
- ‘Save as’ with a new name (good to keep original just in case)
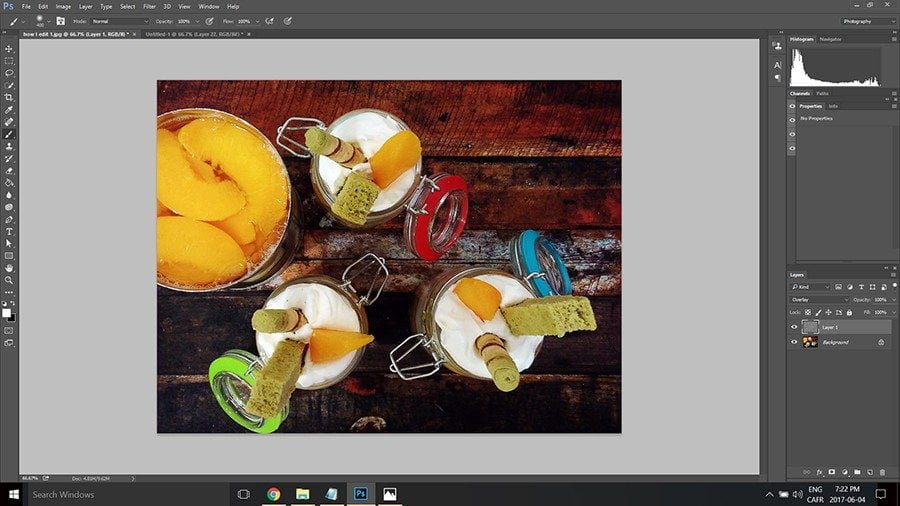
And you are done!
Optional: add your watermark. And save for web (shift+alt+ctrl S) to reduce size to around 90 kb for the blog post so that it can load faster.
NOTE: every time I say open a ### layer, click the circle that is half dark half white in the menu in the bottom right . If you go here you create a layer for each modification, which means you are not destroying the original layer.
Ultimate Food Photo Edit Tutorial
Ingredients
- A digital photo
- Photoshop
Instructions
- Open Photoshop
- Open a photo in Photoshop
- Make sure Layers panel is open on the right (Windows, Layers)
- Crop your image
- Apply an auto Tone shift+ctrl L
- Duplicate your layer ctrl J
- In layers select soft light from drop down and adjust opacity to around 30%
- Duplicate your layer ctrl J
- In layers select overlay
- Select brush tool and pick the color white
- Select a size for the area you want to paint and lower harshness to zero
- Paint in the areas you want to highlight
- In the layers panel set your overlay at around 20% (I went back and set it at 15% later)
- Open a Curves layer to adjust tonal range: add highlight by adding and moving one point on the top of the diagonal line. And add shadow by adding and moving one point on the bottom of the line. Don't overdue it.
- Open a Vibrance layer, here I chose vibrance on the slider at 30 (avoid the saturation slider)
- I am happy with the edit but I want to sharpen the image a bit. First step is to flatten all my layers
- Duplicate your layer ctrl J
- Turn your photo black and white by pressing crtl U
- In layers select overlay
- Go in Filter, Other, High Pass
- In the High Pass window select a radius, usually around 1.5 to 3. Check preview. Press OK.
- 'Save as' with a new name (good to keep original just in case). And you are done!
Notes
NOTE: every time I say open a ### layer, click the circle that is half dark half white in the menu in the bottom right . If you go here you create a layer for each modification, which means you are not destroying the original layer.
I really hope you found this food photo edit tutorial really helpful and that it will take your photo editing skills to the next level.
- If you have any question please ask them in the comment box below!
- Have you got any extra tips to share?
- What software do you use edit photos?




Wow thats a lot steps, lot of love in one post. Not even close to my process, I just use Lightroom and have a recorded workflow of what I usually do.
Great tips.
Thanks Raymund. I do not use every step each time, just showing them all for this demo. But I do it quite fast now automatically lol. Lots of these tips apply to Lightroom too 🙂
I love photography and I especially love learning new tips. I really want to improve my food photos so thanks for sharing!
My pleasure Carmen so glad you found it helpful.
I need to start using an editing app soon. So far I have been managing with Picasa 😛 Will refer to your tutorials once I get my hands on the Photoshop.
Oh wow I have not been on Picasa in so long. So glad you found it helpful and maybe use them soon.
This is very useful. Seems that many people uses lightroom, but I am one of those weirdos who uses PS :)))). I try to do minimal editing but unfortunately I still cannot shoot raw, not skilled enough I think. Thanks for the tips.
YES another thing we have in common, we are PS weirdo buddies Amira lol!I keep forgetting to try RAW.Glad you found it useful!
ANDDDDD BOOK MARKING THE CRAP OUT OF THIS! PHOTO SHOP IS THE MOST CONFUSING THING EVER TO ME!! EVERRRRR!!!!! I hate it. But I wanna love it!
I AM GOON MAKE YOU LOVE PS!!!!!!!!!! So happy you find it very useful! I was super frustreated often till I took a class. not I can do the fancy compostion shots.
Great tips, I normally use Lightroom for everything!
Thanks and lots of these tips can be applied in LR too.
We’re big fans of Lightroom, but we use PhotoShop every once in a while. Thanks for sharing your tips here.
Thanks Mindi and lots of these tips can be applied in LR too 🙂
Great information, Evelyne! I love to see the differences in how everyone edits. I use Lightroom, but I think there are a lot of similarities. I wish I had this info when I started blogging. I have numerous old posts that need some help 🙂
Thanks Liz and lots of these tips can be applied in LR too indeed 🙂 sometimes I do go back and fix photos of old posts if I am going to link to them lol.
That’s really helpful! I like using lightroom for my images 😀
Thanks Lorraine and lots of these tips can be applied in LR too 🙂
Really good tips. Will have to return back to this post when I try this out.
Thanks so much Holly, feel free to print out the ‘recipe card’ with the steps 🙂
Oh Evelyne…it all sound and look so complicated…I just do not have the patience to go through all these steps…I believe that practice will make it perfect…and yes, the photo looks awesome after the photoshop touch…thanks for the great tutorial…I will definitely remember you when decide to work with photoshop.
I hope you have a wonderful rest of the week 🙂
Thank you Juliana, I know it looks overwhelming at first but yeah practice makes it easy. I don’t even look at notes now. Have a great week too!
Awesome tips, I usually use Lightroom but every once in a while I pop open Photoshop and this is really helpful.
Thanks so glad you found some helpful tips. I should give LR another try, hd a bad first experience.
I stopped using photoshop years ago as I don’t edit my photos to that extent. Great tutorial for those who do.
Thanks Tandy, yeah for sure not everyone uses it.
Wow- not even close to what I normally do- but it shows- this is cool and makes me know I need to brush up a ton on my photos- PS- I like how you made it a “recipe”- very cute!
Thanks Barrie for your comment. Well there are all kinds of ways to get from point A to B, this is my way. I hope you try out some of my tips!
Thanks for the tips!
Thanks Cindy
Sounds so complicated! But the result is beautiful. Someday I’m going to have to learn how to do better editing of my photos!
Hey Tami, it really is learnable (I did it), just print the steps cards and you just go through one at a time 🙂 Or just try one or two tips!
Good tips! I shoot raw a lot, so I usually start out in Lightroom. Don’t like the database aspect of it (it’s largely useless to me) but really like all the tools for developing your raws. Then I’ll use Photoshop to make minor curves corrections (and if shooting something on acrylic, to remove dust!) and size the photo for the web. Loads of different methods/ways to get to the same place! Learned a few things from this — thanks so much.
Thank you John I am glad you picked up a few things you can use. Yeah I really got to do RAW soon. I tried Lightroom, was not a fan. And yes so many ways to get to similar results, we each have our techniques 🙂
A great tutorial, Evelyne. The after-picture looks so much cooler!
Thank you Angie and I hopyou picked up a few tips!