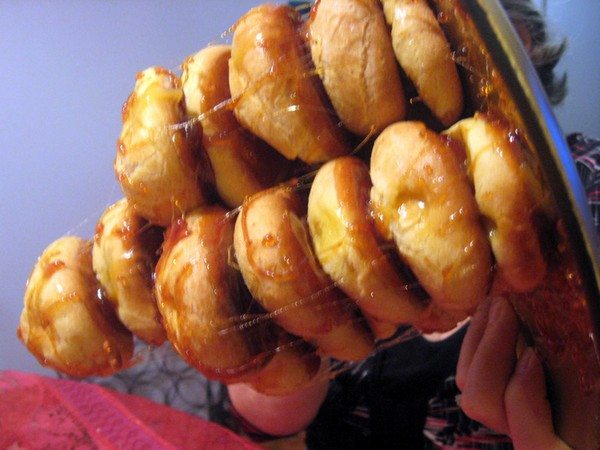
Well I was reminded with this challenge that its not because you know how to make something that you will always succeed. i have made pâte à choux a many times in my life and always without a hitch basically….except this time. I don,t know why when I took them out of the oven they almost all deflated. I also forgot the egg wash but did put some on about 5 after for a prettier top. But my flat balls did not change the taste. I decided to for with a fort formation rather then a cone. I thought it would work better considering my flattened choux. It was a successful mistake!
The May 2010 Daring Bakers’ challenge was hosted by Cat of Little Miss Cupcake. Cat challenged everyone to make a piece montée, or Croque en Bouche, based on recipes from Peter Kump’s Baking School in Manhattan and Nick Malgieri.
The classic piece montée is a high pyramid/cone made of profiteroles (cream-filled puff pastries) sometimes dipped in chocolate, bound with caramel, and usually decorated with threads of caramel, sugared almonds, chocolate, flowers, or ribbons. Modern pastry chefs have taken to assembling this dessert in all manners of shapes and sizes, and you should feel free to express your creativity too!
Note: This recipe has 3 main components: the pate a choux, the crème patissiere, and the glaze used to mount/decorate it. While you can purchase or make a cardboard conical structure to build your piece montée or use toothpicks as an aid, it is relatively easy to assemble it using just the baked pate a choux as the main building blocks and the glaze as the glue.Recipe Source:Peter Kump’s Baking School in Manhattan, originally created by famed pastry chef, Nick Malgieri.
Croque en Bouche
Preparation time:
20 minutes to prepare the puff pastry and pipe, 30min to bake
crème patissiere 10 minutes to cook and cool for at least 6 hours or overnight.
The glazes take about 10 minutes to prepare.
For the Vanilla Crème Patissiere (Half Batch)
1 cup (225 ml.) whole milk
2 Tbsp. cornstarch
6 Tbsp. (100 g.) sugar
1 large egg
2 large egg yolks
2 Tbsp. (30 g.) unsalted butter
1 Tsp. Vanilla
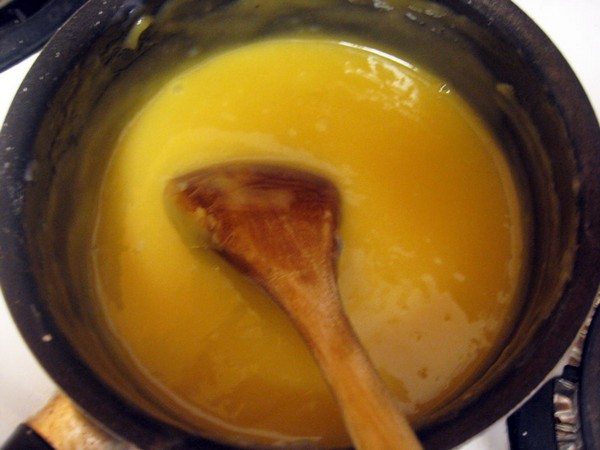
Dissolve cornstarch in ¼ cup of milk. Combine the remaining milk with the sugar in a saucepan; bring to boil; remove from heat.
Beat the whole egg, then the yolks into the cornstarch mixture. Pour 1/3 of boiling milk into the egg mixture, whisking constantly so that the eggs do not begin to cook.
Return the remaining milk to boil. Pour in the hot egg mixture in a stream, continuing whisking.
Continue whisking (this is important – you do not want the eggs to solidify/cook) until the cream thickens and comes to a boil. Remove from heat and beat in the butter and vanilla.
Pour cream into a stainless steel/ceramic bowl. Press plastic wrap firmly against the surface. Chill immediately and until ready to use.
Pate a Choux (Yield: About 28)
¾ cup (175 ml.) water
6 Tbsp. (85 g.) unsalted butter
¼ Tsp. salt
1 Tbsp. sugar
1 cup (125 g.) all-purpose flour
4 large eggs
For Egg Wash: 1 egg and pinch of salt
Pre-heat oven to 425◦F/220◦C degrees. Line two baking sheets with parchment paper.
Combine water, butter, salt and sugar in a saucepan over medium heat. Bring to a boil and stir occasionally. At boil, remove from heat and sift in the flour, stirring to combine completely.
Return to heat and cook, stirring constantly until the batter dries slightly and begins to pull away from the sides of the pan.
Transfer to a bowl and stir with a wooden spoon 1 minute to cool slightly.
Add 1 egg. The batter will appear loose and shiny.
As you stir, the batter will become dry-looking like lightly buttered mashed potatoes.
It is at this point that you will add in the next egg. Repeat until you have incorporated all the eggs.
Transfer batter to a pastry bag fitted with a large open tip (I piped directly from the bag opening without a tip). Pipe choux about 1 inch-part in the baking sheets. Choux should be about 1 inch high about 1 inch wide.
Using a clean finger dipped in hot water, gently press down on any tips that have formed on the top of choux when piping. You want them to retain their ball shape, but be smoothly curved on top.
Brush tops with egg wash (1 egg lightly beaten with pinch of salt).
Bake the choux at 425◦F/220◦C degrees until well-puffed and turning lightly golden in color, about 10 minutes.
Lower the temperature to 350◦F/180◦C degrees and continue baking until well-colored and dry, about 20 min more. Remove to cool. Can be stored in a airtight box overnight.
When you are ready to assemble your piece montée, using a plain pastry tip, pierce the bottom of each choux. Fill the choux with pastry cream using either the same tip or a star tip, and place on a paper-lined sheet. Choux can be refrigerated briefly at this point while you make your glaze. Use one of these to assemble your piece montée.
Hard Caramel Glaze:
1 cup (225 g.) sugar
½ teaspoon lemon juice
Combine sugar and lemon juice in a saucepan with a metal kitchen spoon stirring until the sugar resembles wet sand. Place on medium heat; heat without stirring until sugar starts to melt around the sides of the pan and the center begins to smoke. Begin to stir sugar. Continue heating, stirring occasionally until the sugar is a clear, amber color. Remove from heat immediately; place bottom of pan in ice water to stop the cooking.
Assembly: make a conical shape, trace a circle (no bigger than 8 inches) on a piece of parchment to use as a pattern. Then take some of the larger choux and assemble them in the circle for the bottom layer. Practice seeing which pieces fit together best. Once you are ready to assemble your piece montée, dip the top of each choux in your glaze (careful it may be still hot!), and start assembling on your cake board/plate/sheet. Continue dipping and adding choux in levels using the glaze to hold them together as you build up. When you have finished the design of your piece montée, you may drizzle with remaining glaze or use ribbons, sugar cookie cut-outs, almonds, flowers, etc. to decorate. Have fun and enjoy! Bon appétit!
Did I mention the caramel glaze is a serious glue? See pics of dessert held upside-down and sideways. it did not budge at all. Who needs crazy glue when you have Hard Caramel Glaze, lol.


Ev..your puffs are not flat at all! Your croquembouche looks beautiful!! Fantastic job!!
Now THAT is some serious caramel glue action going on! LOL
Thank you Joumana for the advice. Will try that for the next time!
Evelyne
You did a great job, despite the mishap with the choux; I had this happen to me before and I wanted to tell you of a couple things I tried: one was to keep the oven door ajar while they are baking their last 20 minutes (prop it open with the handle of a wooden spoon) this is supposed to help get rid of the steam so they dont deflate; another is to add egg whites to the batter (about 2 whites) which are made up of protein and solidify the structure.
Have a great weekend Evelyne!
Still looks tasty! I loved the caramel glaze, even if it was like glue!
Ca ressemble a des chouquettes ou des choux! ca fait tellement longtemps que je n’en ai pas mange! hmmm un vrai delice!
It looks delicious… I loved the glue too, the only problem here was that it melted the next day!
Congratulations on finding a way to make flat “puffs” look SO good! And I can not believe the caramel glue! Did you need a chissel to eat it? That must have been so much fun! Great job!!
Ladies, it was so strong…sideways or upside down…it would have rhum cannon balls ;-)e survived
OMG! You were able to flip it upside down and nothing moved! Congrats on this month’s Daring Baker’s challenge. Nicely done!
Love the fort! And those upside-down and sideways pics–great!
Very nicely done! Love it!
Wow Evelyne! It looks amazing 🙂 I didn’t use caramel, but I love how strong yours was! Beautiful :).
that is proper glue! Great job on the challenge.
Evelyne, I have to applaud your efforts. Very festive looking.
And…where were you when my cracked porcelaine needed some fixing???
Flavourful wishes, Claudia
I would so love to try this beautiful dessert!
I love the picture of the croquembouche being held upside down – that is some STRONG glue!! You did a fantastic job.
yes Renata but this is a glue you would be happy to lick off lol!
The finished Pièce still looks good, they don’t look flat! And oh… yes… I agree, this caramel IS serious glue indeed! I’m glad I didn’t have any “glue” on my fingers!
They look great Evelyne! I took quite a few liberties in this challenge but I was mostly quite happy that my choux pastry turned out ok! Next time – the real croquembouche!!