Voting starts today 6am PST for Project Food Blog. Please cast you vote for me to be the next food blog star! Just click this link to my 2nd challenge. Thank you! Voting end Sept 30rd 6pm PST, hurry!
I was kind of really surprised when I saw this month’s challenge. It felt more like a Holiday Season thing: sugar cookies. OK so I was not super pumped but at least it would be an easy challenge which in the summertime is great. The biggest challenge for me was following the mandatory item : You must decorate your cookies with theme of September.
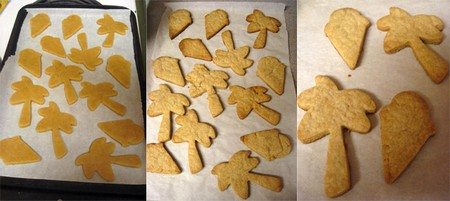
Oh boy, September means nothing to me. I had zero inspiration. I was going to go to a cooking supply store near work, Les Touilleurs, and was hoping a cookie cutter would strike some inspiration. Well it did, sorta, a bit of a long stretch. September means to me DENIAL! I refuse to accept the arrival of fall, of not wearing shorts soon anymore, of not bringing a sweater. So my palm trees and ice cream cones represent my stubbornness of this month seasonal change!
The September 2010 Daring Bakers’ challenge was hosted by Mandy of “What the Fruitcake?!” Mandy challenged everyone to make Decorated Sugar Cookies based on recipes from Peggy Porschen and The Joy of Baking. This is a condensed version of the recipe notes we had…but they are all you need.
Preparation Time
30 minutes: Making dough & rolling, 1 hour min: Refrigeration, 8-15 minutes: Baking per tray
Basic Sugar Cookies:
Makes Approximately 36x 10cm / 4″ Cookies
200g / 7oz / ½ cup + 6 Tbsp Unsalted Butter, at room temperature
400g / 14oz / 3 cups + 3 Tbsp All Purpose / Plain Flour
200g / 7oz / 1 cup Caster Sugar / Superfine Sugar
1 Large Egg, lightly beaten
5ml / 1 tsp Vanilla Extract / Or seeds from 1 vanilla bean
** I added 1 tsp of all spice
Directions
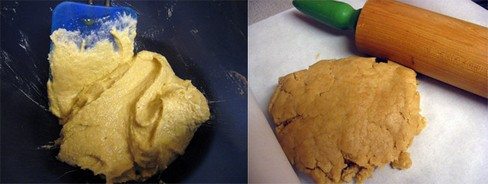
• Cream together the butter, sugar and any flavorings you’re using. Beat until just becoming creamy in texture.
• Beat in the egg until well combined, make sure to scrape down the sides of the bowl.
Add the sifted flour and mix on low until a non sticky dough forms.
• Knead into a ball and divide into 2 or 3 pieces.
• Roll out each portion between parchment paper to a thickness of about 5mm/1/5 inch •Refrigerate for a minimum of 30mins.
• Once chilled, peel off parchment and place dough on a lightly floured surface.
• Cut out shapes with cookie cutters or a sharp knife.
• Arrange shapes on parchment lined baking sheets and refrigerate for another 30mins.
• Re-roll scraps and follow the above process until all scraps are used up.
• Preheat oven to 180°C (160°C Fan Assisted) / 350°F / Gas Mark 4.
• Bake until golden around the edges, about 8-15mins depending on the size.
• Leave to cool on cooling racks.
• Once completely cooled, decorate as desired.
Royal Icing:
315g – 375g / 11oz – 13oz / 2½ – 3 cups Icing / Confectioner’s / Powdered Sugar
2 Large Egg Whites
10ml / 2 tsp Lemon Juice
5ml / 1 tsp Almond Extract, optional
Directions
• Beat egg whites with lemon juice until combined.
• Sift the icing sugar to remove lumps and add it to the egg whites.
• Tip: I’ve listed 2 amounts of icing sugar, the for a flooding, and the larger is for outlining
• Beat on low until combined and smooth.
• Use immediately or keep in an airtight container.
Same Consistency Method
• Mix your royal icing according to the recipe/instructions
• Drag a knife through the surface of the Royal Icing and count to 10
• If the surface becomes smooth between 5 & 10 seconds, the icing is correct
Prepping and Filling Your Bag
• Attach your icing tips to the piping bags using couplers
• Stand the piping bags in glasses with the tops of the bags folded over the top of the glass.
• Fill your icing bags with each colored icing.
• Tie the ends of the piping bags with elastic bands.
Decorating Your Cookies: Flooding
“Flooding” a cookie is a technique used when covering a cookie with Royal Icing.
1. You outline the area you want to flood which helps create a dam
2. Then fill or flood inside the area you’ve outlined
3. If you’re doing a different color border, eg a black border, let the outline dry before flooding.
4.Using a toothpick or clean paintbrush, push the icing around into the gaps.
Decorating: Melding Colors
• If you would like to add lines or dots to the base color that you flooded the cookie with so that they meld and dry as a smooth surface, you need to add the lines/dots/patterns as quickly as possible after flooding and smoothing the surface of the cookie.
• Simply pipe other colors onto the flooded surface in patterns or lines which you can either leave as that or then drag a toothpick through to make marbling patterns.
Decorating: On top of flooding
• If you’d like to do other patterns/outlines or writing on top of the flooded surface so that they are raised above the flooded background, simply allow the icing to dry, preferably over night.
Once fully decorated, allow cookies to dry for 24 hours in a cool and dry area.
General Royal Icing Tips
• Keep a damp cloth handy while decorating your cookies so that if you’re switching between different icing bags, you can keep the tips covered with the damp cloth so that the icing doesn’t dry and clog them.
• If your icing tips do clog, use a toothpick or pin to unclog them.
• Always pipe a little bit of icing onto a paper towel before you begin to make sure there are no air bubbles.
• Remember to always cover bowls containing royal icing wither cling wrap, a damp cloth or sealable lid so that the surface doesn’t dry.


Your denial looks tasty! I must be honest, I’ve never decorated sugar cookies for holidays, I don’t think it’s much of a holiday thing in South Africa (our Christmas is smack in the middle of summer so it’s all about the pool & barbecues). At least it was some practice for the holidays to come 🙂
Very fun cookies, thanks for taking part of the September challenge.
Oh thank you Celeste and Lisa for the votes….I hope I get to the next round too!
Your cookies are so so cute. Hope you get through to the next round for Project Food Blog!
EV..after being sick of Summer and so happy Fall is here, I’ve suddenly had a moment of summery nostalgia since I would love to be sitting under a palm tree eating an ice cream cone! Your cookies are gorgeous and I just voted for youuuu 🙂 Good luck!!
I adore those ice-cream cookies! Just love!!!
Great site; sooo happy I found you!
Mary xo
Delightful Bitefuls
Cute cookies! I love your theme of denial. I too had a hard time deciding on my theme. That and I didn’t want to buy a bunch of new cookie cutters at the moment. Nice job on the challenge!
Here is the info Karla
Here is the site, registering page 😉
http://www.thedaringkitchen.com/user/register
I love it. Totally in denial too. I actually went spring with my cookies.
LOL Denial! I love it! I am in total denial too… I hate the cold weather and everything about it. I am absolutely loving this extended summer weather!
How does one get involved with the Daring Bakers? I wanna baking challenge!
oh i love the ice cream cones!!!
Good job on the cookies Evelyne. I totally didn’t even see that they had to be decorated in the theme of September – ooops!
Denial is a great September theme!! I made little chalkboards in honor of my toddler’s first day of preschool.
Ha ha, glad to see I am not in rebellion and denial!
Denial sounds pretty yummy! Great theme, and I love that cookware store, even though I can’t say or spell it!
🙂
Though I’m happy to welcome fall, these make me want to have one last fling with summer! Nicely done!!
A rebellion heh? Nice one. I think it succeeded!
lol. I know what ya mean. As much as I love fall I refuse to wear shoes that require socks until it’s freezing outside. Beautiful cookies!
Thank you all for your great comments. you are all so nice I’ll give you all a cookie 😀
Evelyne…it certainly takes one stubborn rebel to appreciate another. LOL
I love that you colored outside the line in order to stay true to yourself ;o)
Ciao for now…gotta go vote!
Claudia
Thank you Claudia for you vote. hey we can by the stuff and do this recipe together!
Haha, brilliant! Just come to Australia from September to May, problem solved!
Of course, why did I not think about that. Can I sleep at your place for those months? lol
I love your ice cream cones and palm trees and am solidly with you on not wanting summer to end!! I love the bright colors you used, too – your cookies look fun and delicious. Great job!
Adorable cookies! Will vote for you in 10 minutes 🙂
Your cookies look cute… Great job!
Beautiful cookies. Nicely decorated!
They may be a lot of work but they certainly look worth the effort! Beautifully done!
Your cookies are so cute!
I love the cookie cutters you have! Icecreams and palm trees! Now, they are ones I must look out for!